Tuesday, November 27, 2012

Lost generation...car and man


One of the things I truly love about Argentina is their collection of oldies; the streets are still alive with the remnants of a time almost forgotten. I would not go as far as saying it is their love for the auto-mobiles of old, but rather that they still allow them to roam the streets until their eminent extinction.

I came across this little dirt road littered with steel skeletons, once possibly the shining pride to some owners, probably themselves not with us any more. As you would expect, many of these old fossils were already becoming one with the environment, each complimenting the other. maybe they don't have a owner polishing and waxing them any more, but they sure have a bit of nature love happening.


What a time it must have been, before cars were merely about speed and comfort, but rather crafted works of art. Vehicles made with pride and patience, rather than run down an assembly line made with a one generation lifespan.

Today you have a vehicle stuffed with "pillows" to keep you safe, because if the little tin-can rolled you would be nothing more than a canned pilchard. Yet these die hard oldies would most probably roll off a cliff, dust themselves off while giving a grunt as the engine restarts and drive off into the sunset...

I guess this would be my tribute to the generations of old, even in their last moments they are beautiful, complimented by their surroundings, maybe forgotten by some, but definitely remembered by most. I know for a fact the old timers who drove these bad boys were tough as nails, representing 100% what they drove.

A lost generation; strong, bold, real, honest and something you could count on even in the toughest moments, car and man alike. Unlike the generation of today, comparing man and vehicle would have a rather bleak result, often only strong in appearance, meek, arrogant in behaviour and not really to be counted in even the least of times.

I share these photographs as a salute to the oldies of past...maybe to even be inspired and remember again what it means to be men with integrity and honour. 

Friday, November 23, 2012

Sport photography


I have had the awesome opportunity to photograph various forms of sport, and I hope I can shed a little light on some of the things I have learnt along the way.

The one thing I can say is that every sport has its own rules and that goes for the photographer as well. If it is your first golf tournament, ask the veteran photographers on site for some tips regarding the rules; for instance, don't release the shutter on the golfers back-swing or not using flash photography etc. The last thing you want is to be lambasted by a golfer for doing something ignorantly silly.

Ask, generally photographers are happy to share their knowledge.

Know your sport, if you know nothing of the sport, do some research...

The most important details I can give regarding the camera settings are as follows; Aperture Priority (2.8f if possible), Burst Mode (continual shooting) and ISO (400). The rest you may have to tweak as per the requirements of the shoot, depending on weather or if the shoot is indoors or outdoors.

Generally I shoot in RAW, however when it comes to sport I prefer JPEG, as it allows for a much quicker shutter release when shooting in continual mode. This comes in handy as well if the urgency of sending the images off to a publisher is at play.

Wait for action, and include the ball. For instance, as the surfer hits the lip of the wave, or is in mid air holding the rail, and in golf, trying to include the ball in the frame.

Most sport events do not allow unofficial photographers, so please, before rocking up to an event ready to shoot, first find out if you are permitted. You do not want to burn your bridges for future opportunities just because you were over zealous. 

Wednesday, November 21, 2012

Wedding photography overview


I used examples of a wedding I did in South Africa of the President of Gabon's son; a low key wedding with an high end client.

Weddings can be fun, but you will be working under enormous pressure, as you are dealing with time restraint and only a small window of opportunity to get the shot, there are no "re-do's".

I am going to try and walk you through what I consider to be important. This will basically be an overview, I would assume if you were to take on a wedding as a photographer, you would know how to use your camera. However I will mention this;  going into a wedding with only one camera is looking for trouble. One camera should have a long lens (70 - 200mm / 2.8f) and the other a wide with appropriate individual settings; due to the time restraint you won't have time to still swap lenses and change settings.

I find the most important part of your shoot, the preparation. The meeting of the couple and getting to know them and personalising the shoot to their needs. the reconnaissance of the dress, ceremony and reception venues, getting to know the routes so to avoid getting lost along the way, and also to pre-select your "couple shoot" locations. Testing the light inside the church to see if you may need an alternative light source, as well as pre-selecting your camera settings for  interior and exterior.

If you are struggling with available light, don't be too concerned, boost your ISO to 1600 and correct the exposure / white-balance afterwards (remember to shoot in RAW). The important thing is, are the images sharp?

In the event of it being extremely bright outside, where the sun causes terrible shadows, have your flash ready. Shoot on aperture priority and open it up as to not overexpose. If it is an overcast day, say thanks, because you were blessed with a natural light-box.

This may sound a little "obvious", but remember charging your batteries and even having extra back-up batteries available. Double check your camera bag, and make sure you have everything needed for the shoot.

Basic list of shots to remember...

• Getting ready (bride & some groom photos if possible)
• Church arrival (getting out of the car)
• The ceremony (remember the guests as well, their expressions could be priceless)
• Details and product (rings, flowers, dress, jewellery etc.)
• Bride (think glamour)
• Bride and groom (keep them separated from the guests)
• Families of the bride and groom (have the best man assist in getting everyone ready)
• Group shot (have a ladder available)
• Cutting of the cake
• Speeches and the first dance

As a suggestion, have a couple energy bars and water on hand, it is a long day and you will need all the energy you can get.

Weddings are fun,  as you get to shoot various styles and it truly tests your ability as a professional photographer.

Monday, November 19, 2012

Photographing toddlers


Living in a small Argentinian town has limited my photography subjects to the often requested toddler shoot, initially not a task I would feel up to, partly due to the fact that I would be photographing toddlers...

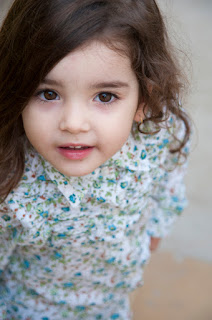
However, I came to the pleasant realisation that photographing toddlers is possibly one of the most rewarding shoots you can do. Toddlers aged between 1 and 3 are still genuine in their emotions and behaviour, making the shoot majority of the time pure joy.

It is all in the eyes, these little guys have life shining from their eyes, and it up to you to try and capture it. I find that shooting from above allows for more light, and it forces the child to open their eyes a little more than usual.

If the shoot is a set-up request, where the folks want a pacifically posed photograph; keep it short and sweet. Little ones get bored very quickly, especially when they are expected to sit still and pose for a photograph. Have your equipment set-up and ready to shoot, you may only have a couple of minutes or less.

If the request is that of fun portraits, let the child run. He or she will give you ample opportunities to capture their joy, smiles and honesty. Have their favourite toys at hand; playing with a ball or peddle-car encourages laughter. The other option is to meet at a park catered for kids with swings etc.

If the child is just not in to the shoot, you have 3 option; come back another day, or wait a while, maybe they relax and you can continue shooting, or take a moment and chill with the child, let them get to know you and get comfortable with you.

Always have tissues with you, just in-case there is a bit of spit or a runny nose...

Generally I rely on natural light  when shooting little ones, sometimes with the help of a reflector though. When shooting inside, and there is no natural light coming from outside, I will use a stand alone flash with umbrella.

I do find the way you approach shooting toddlers has a huge affect on how the shoot will go, for instance if you are ill or not in the right frame of mind to deal with kids on that exact day, postpone the shoot. The happier you are, the happier the kid will be.

Photographing kids is a blessing, enjoy it.

Thursday, November 8, 2012

Basic Hospitality Photography


This is one of my favourite forms of photography, mostly due to the variety. You get to photograph interiors, exteriors, food and even people.

I took the above images in Cape Town, The Tablebay Hotel.

It is actually quite difficult choosing images, as there is so much to show, but for the purpose of this blog, basic tips, they will make do.

Shoot in RAW, the highest quality possible. Your client is used to the best, you give them the best, as simple as that.

Use a tripod, it does not have to be the best and most expensive one on the market, a simple one will do the job just fine.

No date stamps, matter of fact, for any form of photography remove the date stamp function.

When shooting a room, restaurant or lounge area, it is best to shoot at chest hight. you want the person to feel as if he/she is walking in to the room, not stepping down.

Pre-choose the time of day you want to shoot which room, as you don't want there to be too much light coming in from outside. This will ensure you balance both the natural light from outside and the artificial light from inside.

As for the room interiors, you can request assistance beforehand from the hotel staff, making 100% sure the room is ready to shoot by the time you arrive. You can give them a list of things to help them ready the room.

1. All cords need to be hidden (telephone, lights etc.)
2. Remove all the unwanted clutter, such as menu cards, phone and note books, pens etc.)
3. Remove all the waste bins.
4. Televisions and Computers switched off.
5. Beds need to be military of style perfection, and that includes the drapes / curtains.

As for the photographer, shoot multiple images and variations of your location / subject, for instance, shoot with drapes / curtains open and closed, change the angles. Shoot multiple images and stitch or tone-map afterwards.

Remember, the hotel management and staff are there to assist where necessary, ask and you shall receive.

Wednesday, November 7, 2012

Basic night photography


This is a follow up on night photography, the previous being nightscapes with star filled sky's. In this blog I cover the basic principles of night photography.

Cityscape was taken in Dubai
Cathedral was taken in San Jorge, Argentina
Chapel (late 1800's) was taken in Argentina, Santa Fe
Fireworks was taken in Sun City, South Africa


Due to the fact that you are dealing with so many variables when shooting at night, every situation calls for specific settings. however,  before we even get to the settings the two most obvious necessities would be shooting in RAW (if camera compatible), and the other would be shooting on tripod. Shooting in RAW is extremely helpful when shooting at night, you can adjust the exposure and white-balance without negatively affecting the image for instance, whereas the tripod will steady the camera. Due to the low light and slower shutter you can not afford any movement as your image will end up blurred.

If you do not have a remote trigger, you can always use your timer (2 sec. delay), avoiding touching the camera which could result in slight movement.

I suggest shooting in Manual mode as it allows for the best combination of aperture (narrow aperture) and shutter (slow) speed. Generally your shutter can vary between 2 sec. up to 1/30 depending on the amount of light available. For example, in Dubai the city was lit up in the distance, so a 1/15 shutter was more than enough. Getting the start burst in the Chapel photograph required an aperture between f11 or f16, the more narrow the aperture, the better star burst.

When it comes to the nightscapes with plenty light fills, your ISO can be 100/200. This is ideal for retaining perfect sharp images. Unlike the indoor / hand held / performance where you need to bump your ISO up to 1600 at times for because you need a faster shutter to get clear images.

Remember you are shooting digital, so play with your stops, if the image is too light/dark, adjust your aperture 1 / 2 stops up or down.

Finally, time your shots; for instance while photographing the chapel I needed some extra light on the road, so I timed it just right that a car would be the approximate right distance from me as the shutter went off, with a 1/15 shutter delay; after a couple of tries it worked.

In the other instance you could have a little nature luck on your side. During the fireworks photograph there was a split moment with an electrical cloud burst just at the right moment when the shutter went of, lighting up the sky for a beautiful effect.

Thursday, November 1, 2012

Concert photography 2/2


Following the first blog we continue with camera settings.

The photographs used in this blog are all Argentinian artists (1. El Negro 2. Ruvel 3. Luis Pescetti)

Camera settings:

ISO: At first try and use 400, you may be blessed with extremely good lighting, but you may have to up it to 800 or even 1600, depending on how low the light is and the venue. Remember the higher the ISO the grainier the image will be, but with the technology of today, you should get away with a ISO of 1600 without much disturbing grain.

Metering: If possible, set your metering to SPOT mode.

Aperture: How wide can you go? Generally I use a Nikkor 200mmm f2.8 if a couple of meters from the sage, or a Nikkor 50mm f1.8 if positioned nice and close to the stage. However you shoot and with whichever equipment, keep your aperture as wide as possible, allowing for as much light as possible to enter your camera.

Shutter-speed: I  tend to shoot at 1/125, the image may be a little under exposed but sharp. You should be shooting in RAW, so you can adjust the exposure without damaging the quality of the image afterwards. This is where it is important to use the natural lighting to your advantage.

Mix it up a bit, move between manual, shutter and aperture priority for the best results. If you are still new, start on Shutter or Aperture priority, afterwards moving to manual. The more you shoot and more you adjust settings, the more accustomed you will get with your camera, and in no time you will know within the first 30 seconds which settings will work the best.

Finally when editing and adjusting the image, keep it simple. Do not change too much as it could ruin the image. Correct the exposure if necessary, the sharpness or correct the framing by cropping the image.

Enjoy and always remember to have fun.


Concert photography 1/2


This will be the first of two blogs, first I will cover  the rules and how to get the shot, secondly I will explain camera settings.

The photographs used in this blog are all South African Artists (1. Prime Circle 2. Parlotones  3. Lira 4. Flash Republic)

Concert photography can be quite intimidating for the beginner photographer, as there are definite rules to abide by, and rules tend to limit us. I am going to try and explain how to use those rules to your advantage for a successful concert shoot.

Generally you are not allowed to take SLR camera's to a concert, unless permitted and given a pass. Don't sneak in uninvited, it could end ugly for you and it could jeopardise any future possible shoots you may have.

What security says is gold, they are under immense pressure as it is, they don't need lip from a cocky photographer. So if they say "shoot done", you pack up and leave the photographers circle immediately.

Most concerts allow only the first 3 songs to be photographed, keep that in mind and use the limited time wisely.

NO FLASH ALLOWED (this is in capital, because it is important)

Limit the amount of times you hold your camera in the air, as it may become bothersome to the spectators behind you.

Concert photography is not always about how technically knowledgeable you are around a camera, but how well you can read the stage. Knowing how to use the available light, when to "pull the trigger". Sometimes it about waiting for the subject to move towards the light, or waiting for the right colour light to fall on the subject.

Emotion and colour, sweat and energy is what you will want to capture. Watch the performers movements, when he is about to break into a guitar solo, or move away from the mic  so not to obscure his face. Get in close and tight for that signature eye movement or wide to get all the stage lighting in frame.

Remember, you are a guest, always be courteous and professional.